

Getting to know Wwise: Containers Pt. 1.

In this chapter, we will begin exploring the fundamental functionalities and features of four containers: Work Unit, Property Container, Random Container and Sequence Container. We will also explore the process of importing audio and setting up playback points, analyse how property inheritance works, and provide an introduction to randomization and the units governing its range of variation.
WORK UNIT

Let’s begin by discussing the Work Unit, the organizational foundation of a project. A Work Unit is an XML file (.wwu) which categorised as a container as it is created from the "Containers" section of the Project Explorer and serves a purely organisational purpose.
Work Units store information regarding structures and properties of specific parts of a Wwise project. They allow a project to be divided into more granular components, facilitating collaborative work, clearer version control management throught platforms like Perforce or Git, and cleaner asset organization.
Let’s dive into the Work Unit within the Wwise interface. In the Project Explorer window located in the "Designer" layout, you will find the "Audio" tab. This tab contains a folder structure comprising three folders: "Devices," "Busses," and "Containers". We will start by exploring the "Containers" folder and working with the "Default Work Unit" that comes pre-loaded in the interface.

The Work Unit does not contain settings that could affect audio playback behavior within the Property Editor window. It only offers the option to enable or disable the "Inclusion" property, determining whether the Work Unit is included in or ignored in any given sound bank. It also provides a space for making relevant notes.

As previously mentioned, Work Units can be created with the ultimate mission to divide a project into parts; you can create as many Work Units as the project requires, so it is common to use them to separate the project by sound categories such as "Environments," "Music," "Enemies," or "Levels," or however else the project demands. It is important to note that every container and audio file must belong to a Work Unit; otherwise, it is not possible to create containers or import audio.
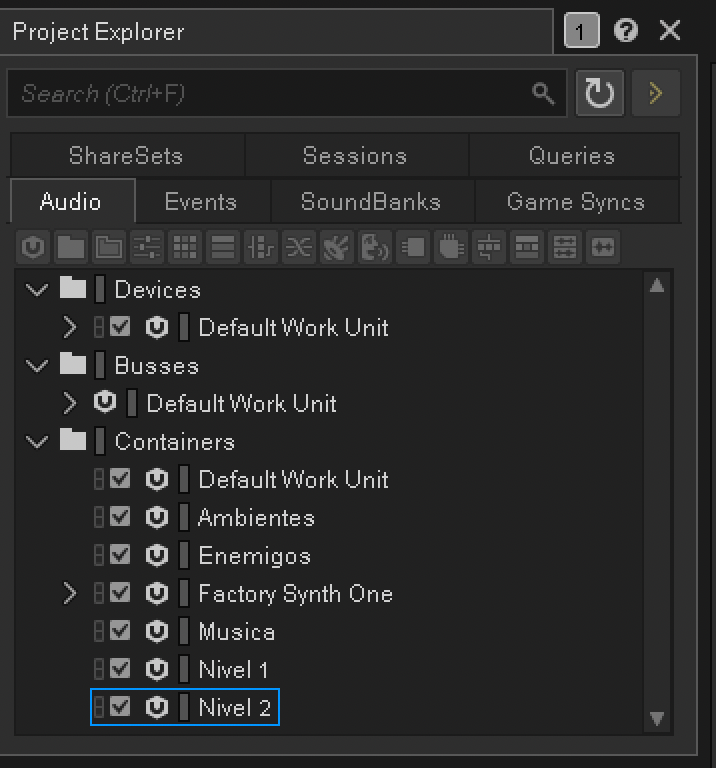
Once we have finished analysing the Work Unit, let’s go ahead and create a Property Container within our Default Work Unit. To do this, locate the “Create new Property Container” icon in the “Audio” tab of the Project Explorer and simply name it “Property”.
Upon selecting the newly created Property Container, we will see several windows, but we will focus on the Property Editor for now.

PROPERTY CONTAINER

The Property Container is another container that serves an organisational purpose but includes additional functions that directly influence how audio plays within the containers nested inside it; this is because a Property Container can pass down various important setting values to all "child" containers—with the exception of those dedicated to music playback, such as the Music Switch Container, Music Playlist Container and Music Segment.
A Property Container allows us to establish global settings for all containers or audio files located within it. The Property Editor features several tabs containing various settings that can be adjusted. For this introduction, we will focus on the "General" tab. Here, we can adjust parameters such as Volume, Pitch, Low Pass Filter, High Pass Filter, and Make-Up Gain.
Additionally, we can enable the randomiser by clicking the small circular icon located within the value fields for these settings.

RANDOMISATION
The randomisation value is of the offset type—that is, a displacement value relative to a reference value established by the user.


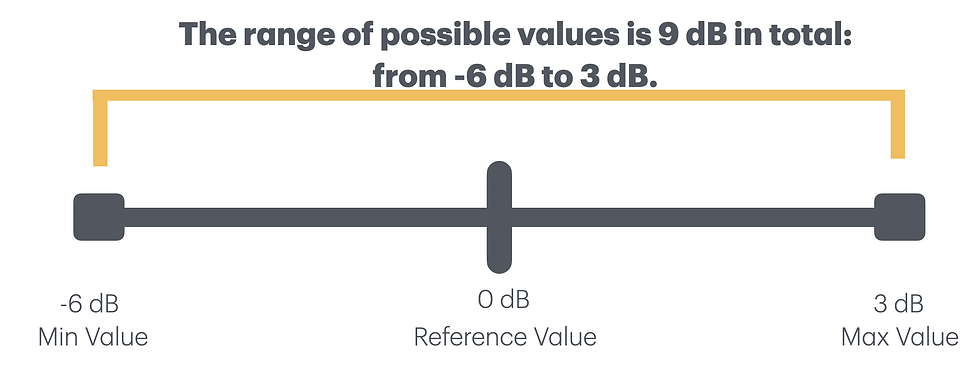
In this example, we can see that the reference value set by the user is 0 dB.
The minimum offset is -6 dB and the maximum is 3 dB, so the volume values can vary within a total range of 9 dB, spanning from -6 dB to 3 dB.

In this other example, we can see that the reference value set by the user is -3 dB. The minimum offset is -3 dB and the maximum is 3 dB; therefore, the volume values can vary within a total range of 6 dB, spanning from -6 dB to 0 dB.
When the reference value is something other than 0 dB, understanding the variation range can be confusing. To determine the minimum and maximum values of this range, the Minimum Offset and Maximum Offset are added to the reference value which, in this case, is -3 dB.
The minimum value of this variation range will be:
-3 dB (reference value) + (-3 dB (Min Offset)) = -6 dB
Whereas the maximum value of the variation range will be:
-3 dB (reference value) + (3 dB (Max Offset)) = 0 dB

The units used for randomization in each of the settings on the General tab are as follows:
Volume: Measured in decibels (with a range spanning from -108 dB to 108 dB).
Pitch: Measured in cents, with a range spanning from -4800 to 4800 cents (100 cents equals one semitone, while 1200 cents equals a full octave).
LPF and HPF: Measured in percentages (from 0% to 100%, where 0% means the filter is inactive and 100% represents maximum attenuation).
Make-Up Gain: Measured in decibels (with a range spanning from -192 dB to 192 dB).
Initial Delay: Measured in seconds, with a range spanning from -60 to 60 seconds.
Number of Loops: Defined by integers, with a range spanning from -32,766 to 32,766.
Transitions: Measured in seconds, with a range of -10 to 10 seconds. An exception is the "Sample Accurate" setting, to which randomisation cannot be applied.
Property Inheritance
Reviewing Property Editor settings is crucial, as these settings can inadvertently apply unwanted values to "child" containers or audio files. This inheritance behavior is not unique to the Property Container; it applies to all containers and their "child" elements. To illustrate this concept clearly, consider the following example:
Suppose we have a Property Container with predefined settings that holds two "child" containers, which in turn contain some audio files. The values set in the parent Property Container are: Volume -22 dB, Pitch 470 Cents, and LPF 20%. These settings will be added to (or subtracted from) the settings configured for each container; those settings, in turn, are added to (or subtracted from) the settings of the audio files contained within them. This creates a "cascading" effect.

For example, consider an audio file with a volume of -3 dB inside a Random Container that has a volume attenuation of -3 dB; since this Random Container is simultaneously part of a Property Container assigned a volume attenuation of -2 dB, the audio file will play at a volume of -8 dB (-3 dB + (-3 dB) + (-2 dB)).


Neither "child" containers nor "child" audio files will be able to locally ignore settings made in the "General" tab that are inherited from the "parent" container; however, settings made in the "Routing," "Conversion," "Positioning," and "Advanced" tabs of the "parent" container can be ignored at the level of the "child" container or "child" audio file. We will cover more details on this as we progress through the topics.
Random Container

The next container to examine is the Random Container, which allows for the random playback of audio files using the "Random" play type, "Standard" or "Shuffle" randomization modes, and either "Continuous" or "Step" playback modes.
In Continuous mode, playback can be set to loop or use transitions with either random or fixed triggering time. It is worth noting that if the "Sequence" play type is selected, the container will automatically convert into a Sequence Container.
Randomisation modes for the Random Play type
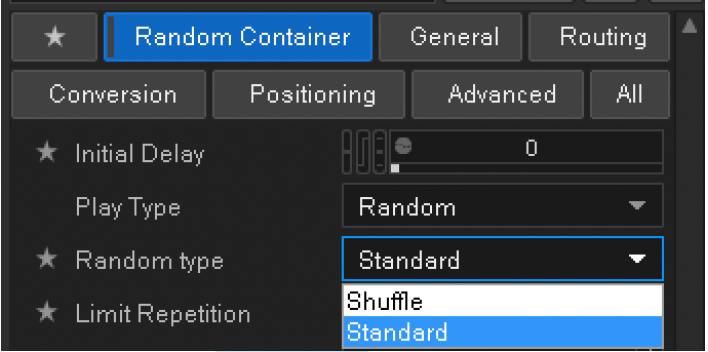
In the Random Type Standard mode, all audio files have an equal probability of being played, including the possibility of being played repeatedly.
In Shuffle mode, the system ensures that all audio elements in the pool are played before any given element repeats.
When using the Limit Repetition function, Wwise prevents a file from repeating too frequently. Here, you can specify how many other sounds must play before a particular sound can be played again.

This container allows us to enable randomisation for Initial Delay, Number of Loops (Continuous mode only), and transition times.


Let's head to the Wwise interface and create our first Random Container. To do this, go to the Audio tab in the Project Explorer, select the Default Work Unit, and then choose "Create new Random Container" from the top menu; we will simply name it "Random."

Importing Audio
The fun begins when we import audio into our project. To do this, right-click on the newly created Random Container and select “Import Audio Files.”

The "Audio File Importer" window will appear. Here, you will find options such as "Import Mode" and "Import as," which we will leave set to "Create New Objects" and "Sound SFX" for the time being.


This window also indicates the location of our imported files (Audio file destination) as well as the destination object (Object Destination)—in this case, the Random Container. We can import audio, folders, and text files (typically created in Excel) to import large numbers of files in a single import process.
When importing audio, Wwise gives us the option to import it as a Sound SFX or as a No Object; we will be working with the “Sound SFX” option.

When importing a folder, Wwise offers the option to automatically create a container containing Sound SFX objects. These containers can be Random, Sequence, Switch, or Blend containers.

We will import various audio files by clicking "Add Files"; the Finder or File Explorer window will appear, allowing us to locate the files to be imported. We will then click "Open" and finally click "Import" at the bottom right of the Audio File Importer.


Once the audio files have been imported, you can double-click on them to open their properties and set the start and end points for playback by dragging the two small boxes located at the bottom corners, as shown in the image.

We will use two flags as reference points: a green one to indicate the starting point for audio playback, and a red one to indicate the end point. The yellow bar shows the elapsed time within the audio file.
Fade-in and fade-out effects can be applied using the triangles—or arrows—located at both ends of the top section, as shown. Any changes can be reverted using the "Reset" button.

Once the audio files have been imported, we can adjust the "Weight" value for each file using the Random Container. This value determines the likelihood of a given audio file being played. The range is 0 to 100, with 100 representing the maximum probability that the file will be selected for playback. To audition each imported sound, simply press the spacebar.

The next step is to introduce variety into our audio files using the Random Container tab in the Property Editor. And what better way to understand this than by listening? I encourage you to watch the video to hear the sonic variety and see the specific settings adjusted, as well as the randomisation applied to each parameter within the Random Container.
A quick note of caution: be careful when experimenting as applying high values for volume and make-up gain whether directly to the setting or via randomisation parameters as this could damage your hearing.
Sequence Container

The Sequence Container allows us to play audio files sequentially—in a pre-established order.
It allows us to play the playlist from the beginning or in reverse—from the last audio file to the first—once the initial sequence concludes.
It also offers two playback modes: continuous or step-based. In continuous mode, we can choose between looping playback or transitions with either random or fixed playback timings.
It is worth noting that if we select the "Random" playback type, the container automatically converts into a Random Container.
When dealing with a sound sequence, randomisation values are applied to the sounds each time an element from the list is played during the sequence. Unlike the Random Container, for the Sequence Container to play audio, the imported files must be added to the Playlist window by dragging the audio files in the desired sequence order.

The next step is to introduce variety into our audio files using the Sequence Container tab in the Property Editor. I encourage you to watch the video to hear the sonic variety and see the specific settings adjusted, as well as the randomisation applied to each parameter within the Sequence Container.
A quick note of caution: be careful when experimenting as applying high values for volume and make-up gain whether directly to the setting or via randomisation parameters as this could damage your hearing.
That’s all for today’s episode! I hope you found it useful. Don’t miss the next episode, where we’ll continue exploring more about Wwise and its containers!
Sound on!


Comments